Arduino 快速外部 SPI 快閃記憶體
Arduino: fast external SPI Flash memory
今天我們來看看SPI快閃記憶體(NOR Flash)。它們是一個單晶片,可以透過SPI進行管理,具有高速存取和低功耗的特性。
快閃記憶體 是一種電子非揮發性電腦記憶體儲存介質,可以電擦除和重新編程。快閃記憶體的兩種主要類型:NOR 快閃記憶體和 NAND 快閃記憶體,以 NOR 和 NAND 邏輯閘命名。 NAND 快閃記憶體和 NOR 快閃記憶體採用相同的單元設計,由浮柵 MOSFET 組成。它們在電路層面上有所不同:在NAND快閃記憶體中,位元線和字線之間的關係類似於NAND閘;而在NAND快閃記憶體中,位元線和字線之間的關係類似於NAND閘。在NOR快閃記憶體中,它類似於或非門;這取決於位線或字線的狀態是拉高還是拉低。
快閃記憶體是一種浮柵記憶體,由東芝於 1980 年發明,基於 EEPROM 技術。東芝於 1987 年開始銷售快閃記憶體。EPROM 必須完全擦除才能重寫。然而,NAND 快閃記憶體可以按區塊(或頁)進行擦除、寫入和讀取,區塊(或頁)通常比整個裝置小得多。 NOR 快閃記憶體允許將單一機器字寫入已擦除位置或獨立讀取。快閃記憶體元件通常由一個或多個快閃記憶體晶片(每個晶片包含許多快閃記憶體單元)以及單獨的快閃記憶體控制器晶片組成。
維基百科
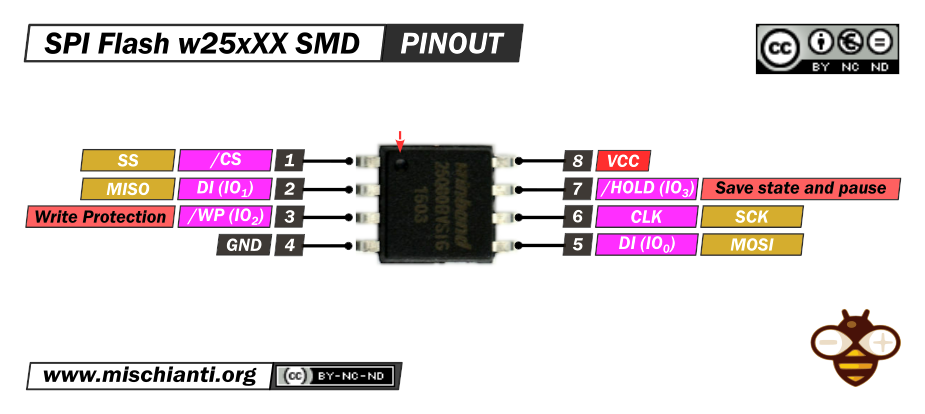
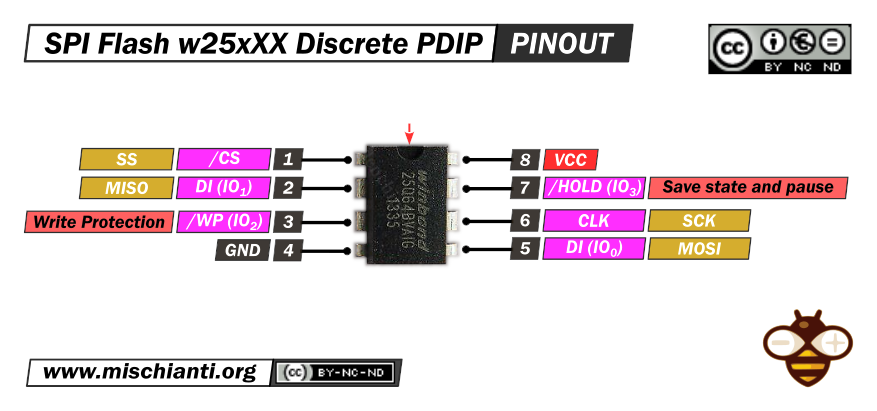
SPI 快閃記憶體引腳排列
有SMD和透過SPI協議管理的分立IC。
大多數 SPI Flash(華邦、富士通等)的接腳排列都是相同的,SMD 和分立元件也是相同的。
SPI 快閃記憶體離散 PDIP 引腳排列
這裡有一組不同大小的 SPI 快閃記憶體 w25q16 SMD 2Mb – w25q16 Discrete 2Mb – w25q32 SMD 4Mb – w25q32 Discrete 4Mb – w25q64 SMD 8Mb – w2564 Discrete 4Mb – w25q64 SMD 8Mb – w2564 Discrete 8Mb – w25q 5Q32 W 25Q64 w25q128 模組 4Mb 8Mb 16Mb
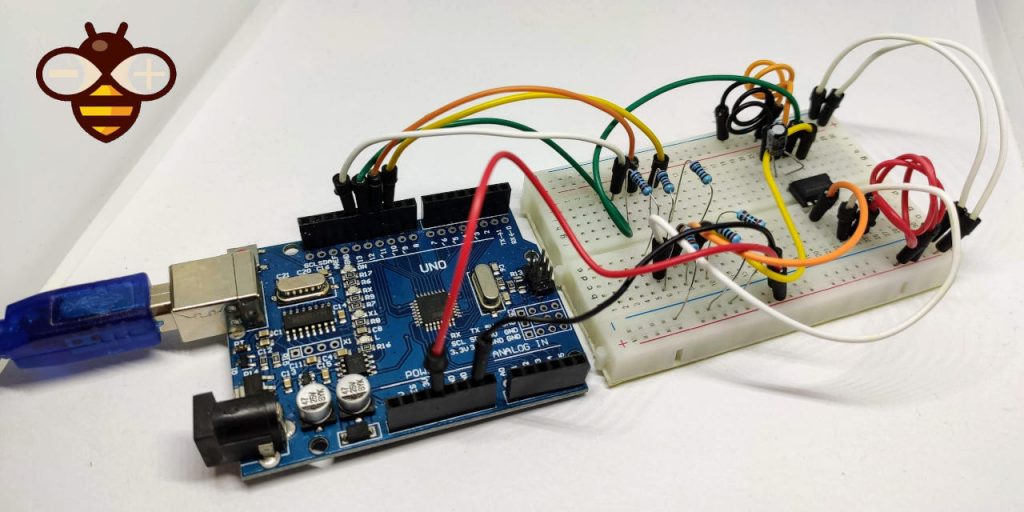
Arduino接線圖
連接的第一個問題是Arduino UNO有5v邏輯,但SPI Flash有3.3v邏輯,所以最快的連接方式(但不是最好的)是使用分壓器,參考這篇文章「分壓器:計算器和應用程式“,另一種解決方案是使用邏輯電平轉換器,這是一種將邏輯從電壓轉換為另一種電壓的簡單設備,反之亦然。
這裡是邏輯電平轉換器 Aliexpress
連接模式變成這樣:
| Arduino | SPI快閃記憶體 | |
|---|---|---|
| 10 | /CS | 如果不是標準 CS,則拉起; 分壓器。 |
| 11 | DI(輸入輸出1) | 分壓器 |
| 12 | DI(IO 0) | |
| 13 | 時鐘 | 分壓器 |
| 3.3V | /WP | |
| 3.3V | /抓住 | |
| 接地 | 接地 | |
| 3.3V | 電壓控制電路 |
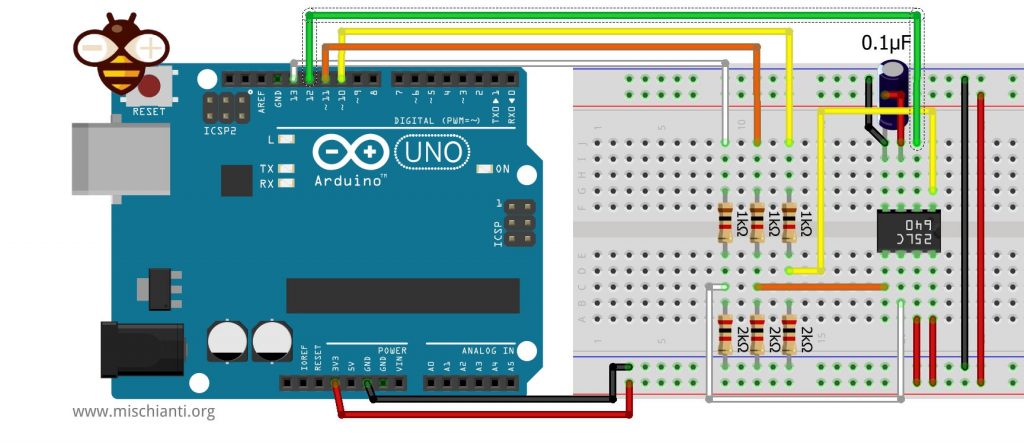
我加了一個0.1μF的電容,效果很好,但這種情況下的標準值是0.01μF
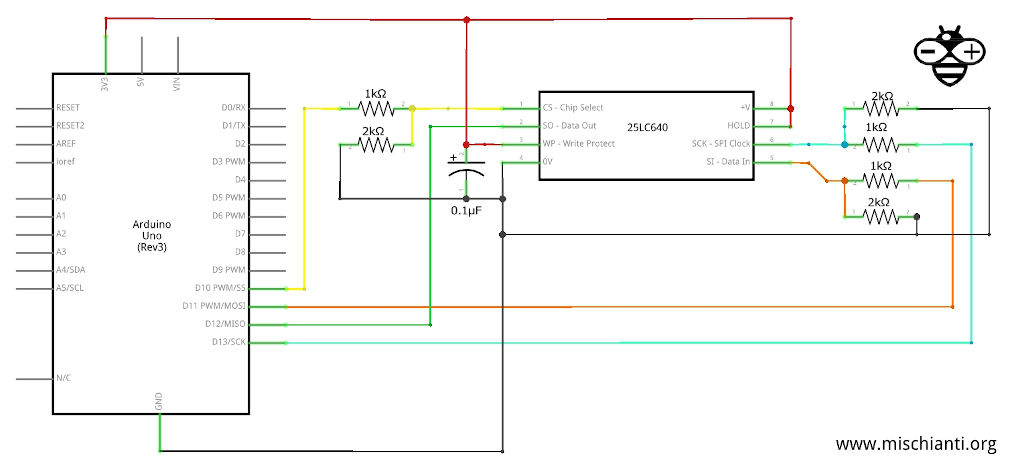
它工作得很好,但如果你想使用雙 SPI 模式,你還需要使用 MISO 來讀取數據,而且這種連接不是雙向的,所以你需要一個雙向邏輯電平轉換器。
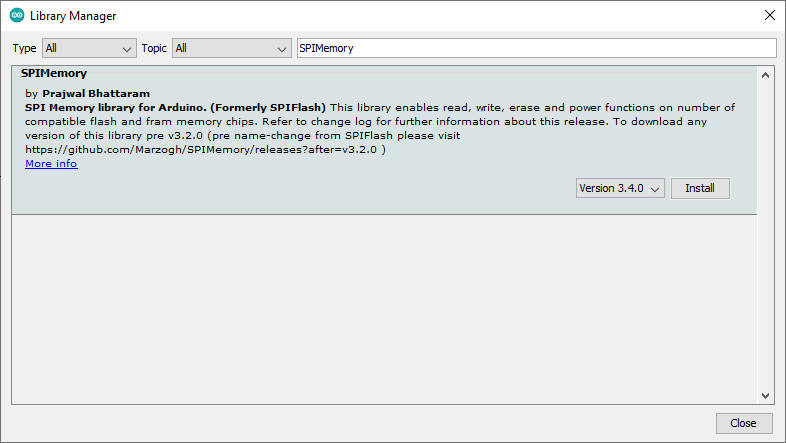
圖書館
為這些測試選擇的函式庫是 SPIMemory。它運作良好且資源較少。
您也可以直接在 Arduino IDE 中下載它。
故障排除
您的記憶體不太可能無法被識別,但如果發生這種情況,則可能是 SPI 通道配置問題。支援的記憶體類型集非常廣泛:
1 2 3 4 5 6 7 8 9 10 | const uint8_t _capID[18] ={0x10, 0x11, 0x12, 0x13, 0x14, 0x15, 0x16, 0x17, 0x18, 0x19, 0x41, 0x42, 0x43, 0x4B, 0x00, 0x01, 0x13, 0x37};const uint32_t _memSize[18] ={KB(64), KB(128), KB(256), KB(512), MB(1), MB(2), MB(4), MB(8), MB(16), MB(32), MB(2), MB(4), MB(8), MB(8), KB(256), KB(512), MB(4), KB(512)};// To understand the _memSize definitions check defines.hconst uint8_t _supportedManID[9] = {WINBOND_MANID, MICROCHIP_MANID, CYPRESS_MANID, ADESTO_MANID, MICRON_MANID, ON_MANID, GIGA_MANID, AMIC_MANID, MACRONIX_MANID};const uint8_t _altChipEraseReq[3] = {A25L512, M25P40, SST26}; |
如果您的快閃記憶體有問題,可能是 SPI 設定問題。
例如,雖然您使用標準 SPI 通道,但您也會使用 SPIMemory 的標準建構函數,如下所示:
1 | SPIFlash flash; |
最好像這樣指定配置,其中 SS 是 CS 選擇器,SPI 是 SPI 通道:
1 | SPIFlash flash(SS, &SPI); |
如果您已經遇到問題,請嘗試設定 SPI 通道的速度,因為所有程式庫都嘗試使用 CPU 頻率找到 SPI 的最佳效能,但在某些情況下可能不起作用,因此請使用此命令降低 SPI 時脈。
1 | flash.setClock(12000000); // uncomment here for Arduino SAMD boards |
命令
這些命令非常簡單,可以用來管理很多情況。當然,RAM 使用率非常低,如果您注意的話,可以在 Arduino UNO 等記憶體非常低的裝置上輕鬆管理它。
1 2 3 4 5 6 7 8 9 10 11 12 13 14 15 16 17 號 18 19 20 21 22 23 24 25 26 27 28 29 30 31 32 33 34 35 36 37 38 39 40 41 42 43 44 45 46 47 48 49 50 51 52 53 54 55 | bool sfdpPresent(void);uint8_t error(bool verbosity = false);uint16_t getManID(void);uint32_t getJEDECID(void);uint64_t getUniqueID(void);uint32_t getAddress(uint16_t size);uint16_t sizeofStr(String &inputStr);uint32_t getCapacity(void);uint32_t getMaxPage(void);float functionRunTime(void);//-------------------------------- Write / Read Bytes ---------------------------------//bool writeByte(uint32_t _addr, uint8_t data, bool errorCheck = true);uint8_t readByte(uint32_t _addr, bool fastRead = false);//----------------------------- Write / Read Byte Arrays ------------------------------//bool writeByteArray(uint32_t _addr, uint8_t *data_buffer, size_t bufferSize, bool errorCheck = true);bool readByteArray(uint32_t _addr, uint8_t *data_buffer, size_t bufferSize, bool fastRead = false);//-------------------------------- Write / Read Chars ---------------------------------//bool writeChar(uint32_t _addr, int8_t data, bool errorCheck = true);int8_t readChar(uint32_t _addr, bool fastRead = false);//------------------------------ Write / Read Char Arrays -----------------------------//bool writeCharArray(uint32_t _addr, char *data_buffer, size_t bufferSize, bool errorCheck = true);bool readCharArray(uint32_t _addr, char *data_buffer, size_t buffer_size, bool fastRead = false);//-------------------------------- Write / Read Shorts --------------------------------//bool writeShort(uint32_t _addr, int16_t data, bool errorCheck = true);int16_t readShort(uint32_t _addr, bool fastRead = false);//-------------------------------- Write / Read Words ---------------------------------//bool writeWord(uint32_t _addr, uint16_t data, bool errorCheck = true);uint16_t readWord(uint32_t _addr, bool fastRead = false);//-------------------------------- Write / Read Longs ---------------------------------//bool writeLong(uint32_t _addr, int32_t data, bool errorCheck = true);int32_t readLong(uint32_t _addr, bool fastRead = false);//--------------------------- Write / Read Unsigned Longs -----------------------------//bool writeULong(uint32_t _addr, uint32_t data, bool errorCheck = true);uint32_t readULong(uint32_t _addr, bool fastRead = false);//-------------------------------- Write / Read Floats --------------------------------//bool writeFloat(uint32_t _addr, float data, bool errorCheck = true);float readFloat(uint32_t _addr, bool fastRead = false);//-------------------------------- Write / Read Strings -------------------------------//bool writeStr(uint32_t _addr, String &data, bool errorCheck = true);bool readStr(uint32_t _addr, String &data, bool fastRead = false);//------------------------------- Write / Read Anything -------------------------------//template <class T> bool writeAnything(uint32_t _addr, const T& data, bool errorCheck = true);template <class T> bool readAnything(uint32_t _addr, T& data, bool fastRead = false);//-------------------------------- Erase functions ------------------------------------//bool eraseSection(uint32_t _addr, uint32_t _sz);bool eraseSector(uint32_t _addr);bool eraseBlock32K(uint32_t _addr);bool eraseBlock64K(uint32_t _addr);bool eraseChip(void);//-------------------------------- Power functions ------------------------------------//bool suspendProg(void);bool resumeProg(void);bool powerDown(void);bool powerUp(void); |
您必須注意這些命令:
uint32_t getCapacity(void):取得晶片的容量,這個庫提供了對很多IC的支持,可能當你嘗試它時,為你找到所有規格,如果沒有,你可以將設備的大小傳遞給命令begin(capacity)。
uint32_t getAddress(uint16_t size):使用此命令可以獲得一個可以儲存uint16_t size資料的空閒位址。
write commands:對於各種類型的資料有很多命令,非常直觀,總而言之,您必須指定一個起始位址,該起始位址將用作寫入資料的起始點。
read command:與寫入命令一樣,還有讀取命令可用於重新讀取連續資料。
template bool writeAnything(uint32_t _addr, const T& data, bool errorCheck = true):更有趣的是writeAnithing 用於儲存複雜結構的命令,記住,該結構必須使用靜態大小值創建,不能使用 String 或類似的資料。
template bool readAnything(uint32_t _addr, T& data, bool fastRead = false):當你寫一個結構體時,你必須重新讀取It,而這個命令做了It,對於所有的讀取命令,你可以設定fastRead 為true,但不是所有的SPI Flash都支援It,查看datasheet。
erase commands:你可以擦除晶片的各種尺寸和部分,你可以看到命令列表。
bool eraseChip(void):還有一個特殊的擦除指令,可以將所有晶片格式化為初始狀態。
bool suspendProg(void), bool resumeProg(void):您可以暫停擦除命令,並立即開始讀取。
bool powerDown(void), bool powerUp(void):將設備置於低功耗狀態。使用電池供電時效果很好。在powerDown()晶片中只會做出反應powerUp()。
例子
該庫在這裡提供了大量範例,我將向您展示基本用法。
這是一個簡單的範例,將第一個字串儲存在初始位址 0 中,然後我重新讀取它,而不是詢問該方法getAddress 是否可以儲存另一個字串的第一個可用連續位置,然後保存它並重新讀取。
對於Arduino MKR,您必須像這樣設定建構函數:
SPIFlash flash(SS, &SPI); |
取得SPI Flash信息
1 2 3 4 5 6 7 8 9 10 11 12 13 14 15 16 17 號 18 19 20 21 22 23 24 25 26 27 28 29 30 31 32 33 34 35 36 37 38 39 40 41 42 43 44 45 46 47 48 49 50 51 52 53 54 55 56 57 58 59 60 61 62 63 64 65 66 67 68 69 70 71 72 73 74 75 76 77 78 79 80 81 82 | /* * Manage external SPI Flash with Arduino * Write and read a string, * find first address available * and write and read another string * * with library SPIMemory * * by Mischianti Renzo <https://mischianti.org> * * * SPIFlash connected via SPI standard * */#include<SPIMemory.h>//SPIFlash flash; // If you don't specify the library use standard SPI connectionSPIFlash flash;void setup() { Serial.begin(115200); while (!Serial) ; // Wait for Serial monitor to open delay(100);// flash.setClock(12000000); // uncomment here for Arduino SAMD boards flash.begin(); // If SPIMemory isn't recognized you can specify the size of memory// flash.eraseChip(); Serial.print(F("Flash size: ")); Serial.print((long)(flash.getCapacity()/1000)); Serial.println(F("Kb")); unsigned long strAddr = 0; unsigned long strAddrSecondString = 0; Serial.println(); String inputString = "I'm going to write this string on IC"; flash.writeStr(strAddr, inputString); Serial.print(F("Written string: ")); Serial.println(inputString); Serial.print(F("To address: ")); Serial.println(strAddr); String outputString = ""; if (flash.readStr(strAddr, outputString)) { Serial.print(F("Read string: ")); Serial.println(outputString); Serial.print(F("From address: ")); Serial.println(strAddr); } Serial.println(); String secondInputString = "I'm going to write this second string on IC"; Serial.print(F("Check first free sector: ")); strAddrSecondString = flash.getAddress(secondInputString.length()); Serial.println(strAddrSecondString); Serial.println(); flash.writeStr(strAddrSecondString, secondInputString); Serial.print(F("Written string: ")); Serial.println(secondInputString); Serial.print(F("To address: ")); Serial.println(strAddrSecondString); outputString = ""; if (flash.readStr(strAddrSecondString, outputString)) { Serial.print(F("Read string: ")); Serial.println(outputString); Serial.print(F("From address: ")); Serial.println(strAddrSecondString); } while (!flash.eraseSector(strAddr)); while (!flash.eraseSector(strAddrSecondString));}void loop() {} |
這是串行結果:
1 2 3 4 5 6 7 8 9 10 11 12 13 | Flash size: 8388KbWritten string: I'm going to write this string on ICTo address: 0Read string: I'm going to write this string on ICFrom address: 0Check first free sector: 43Written string: I'm going to write this second string on ICTo address: 43Read string: I'm going to write this second string on ICFrom address: 43 |
保存和讀取 JSON 結構
這是一個更實際的例子,我們不會像字串一樣保存文本,而是像字串一樣保存 JSON 結構。
1 2 3 4 5 6 7 8 9 10 11 12 13 14 15 16 17 號 18 19 20 21 22 23 24 25 26 27 28 29 30 31 32 33 34 35 36 37 38 39 40 41 42 43 44 45 46 47 48 49 50 51 52 53 54 55 56 57 58 59 60 61 62 63 64 65 66 67 68 69 70 71 72 73 74 75 76 77 78 79 80 81 82 83 84 85 86 87 88 89 90 91 92 93 94 95 96 97 98 99 100 101 102 103 104 105 106 107 108 109 110 111 112 113 114 115 116 117 118 119 120 121 122 123 124 | /* * Manage external SPI Flash with Arduino * Write and read a JSON structure like a String, * find first address available * and write and read another JSON structure * * with library SPIMemory * * by Mischianti Renzo <https://mischianti.org> * * * SPIFlash connected via SPI standard * */#include <SPIMemory.h>#include <ArduinoJson.h>//SPIFlash flash; // If you don't specify the library use standard SPI connectionSPIFlash flash;void setup() { Serial.begin(115200); while (!Serial) ; // Wait for Serial monitor to open delay(100); // flash.setClock(12000000); // uncomment here for Arduino SAMD boards flash.begin(); // If SPIMemory isn't recognized you can specify the size of memory // flash.eraseChip(); Serial.print(F("Flash size: ")); Serial.print((long)(flash.getCapacity()/1000)); Serial.println(F("Kb")); unsigned long strAddr = 0; unsigned long strAddrSecondString = 0; Serial.println(); // Allocate a temporary JsonDocument // Don't forget to change the capacity to match your requirements. // Use arduinojson.org/v6/assistant to compute the capacity. // StaticJsonDocument<512> doc; // You can use DynamicJsonDocument as well Serial.println(F("Generate JSON file!")); DynamicJsonDocument doc(512); // Set the values in the document doc["energyLifetime"] = 21698620; doc["energyYearly"] = 1363005; Serial.print(F("Put data in a buffer.. ")); // Serialize JSON to file String buf; if (serializeJson(doc, buf) == 0) { Serial.println(F("failed to write buffer")); } if (flash.writeStr(strAddr, buf)){ Serial.print(F("OK, writed on address ")); Serial.println(strAddr); }else{ Serial.println(F("KO")); } String outputString = ""; if (flash.readStr(strAddr, outputString)) { Serial.print(F("Read json: ")); Serial.println(outputString); Serial.print(F("From address: ")); Serial.println(strAddr); } Serial.println(F("Generate JSON file!")); DynamicJsonDocument doc2(512); // Set the values in the document doc2["energyLifetime"] = 222; doc2["energyYearly"] = 333; Serial.println(); Serial.print(F("Check first free sector: ")); strAddrSecondString = flash.getAddress(doc2.size()); Serial.println(strAddrSecondString); Serial.println(); Serial.print(F("Stream data in flash memory!")); Serial.print(F("Put data in a buffer..")); // Serialize JSON to file String buf2; if (serializeJson(doc2, buf2) == 0) { Serial.println(F("failed to write buffer")); } // Print test file if (flash.writeStr(strAddrSecondString, buf2)){ Serial.print(F("OK, writed on address ")); Serial.println(strAddrSecondString); }else{ Serial.println(F("KO")); } String outputString2 = ""; if (flash.readStr(strAddrSecondString, outputString2)) { Serial.print(F("Read data: ")); Serial.println(outputString2); Serial.print(F("From address: ")); Serial.println(strAddrSecondString); } while (!flash.eraseSector(strAddr)); while (!flash.eraseSector(strAddrSecondString));}void loop() {} |
這是控制台結果。
1 2 3 4 5 6 7 8 9 10 11 12 13 | Flash size: 8388KbGenerate JSON file!Put data in a buffer.. OK, writed on address 0Read json: {"energyLifetime":21698620,"energyYearly":1363005}From address: 0Generate JSON file!Check first free sector: 56Stream data in flash memory!Put data in a buffer..OK, writed on address 56Read data: {"energyLifetime":222,"energyYearly":333}From address: 56 |
保存和讀取結構
當然,您可以使用 JSON 結構來保存複雜的數據,但如果您想獲得最佳性能和更好的空間利用率,則必須使用這樣的結構。
1 2 3 4 5 6 7 8 9 10 11 12 13 14 15 16 17 號 18 19 20 21 22 23 24 25 26 27 28 29 30 31 32 33 34 35 36 37 38 39 40 41 42 43 44 45 46 47 48 49 50 51 52 53 54 55 56 57 58 59 60 61 62 63 64 65 66 67 68 69 70 71 72 73 74 75 76 77 78 79 80 81 82 83 84 85 86 87 88 89 90 91 92 93 94 95 96 97 98 99 100 101 102 103 104 105 106 107 108 109 110 111 112 | /* * Manage external SPI Flash with Arduino * Write and read a structure * * with library SPIMemory * * by Mischianti Renzo <https://mischianti.org> * * * SPIFlash connected via SPI standard * */#include<SPIMemory.h>// I'm going to use the structure use in standard examplestruct ConfigurationIn { float lux = 3.24; float vOut = 4.45; // Voltage ouput from potential divider to Analog input float RLDR = 1.234; // Resistance calculation of potential divider with LDR bool light = true; uint8_t adc = 45; uint8_t arr[8] = {0, 1, 2, 3, 4, 5, 6, 7}; struct MISC { byte tempHigh = 30; byte tempLow = 20; bool parkingMode = false; bool allowDataToBeSent = false; } misc; struct NETWORK { char ssid[5] = "ssid"; char pwd[4] = "pwd"; char userid[7] = "userid"; } network; struct CHARGING_INFO { byte interval = 5; byte highChargingDefault = 80; } charging;};ConfigurationIn configurationIn;struct ConfigurationOut { float lux; float vOut; // Voltage ouput from potential divider to Analog input float RLDR; // Resistance calculation of potential divider with LDR bool light; uint8_t adc; uint8_t arr[8]; struct MISC { byte tempHigh; byte tempLow; bool parkingMode; bool allowDataToBeSent; } misc; struct NETWORK { char ssid[5]; char pwd[4]; char userid[7]; } network; struct CHARGING_INFO { byte interval; byte highChargingDefault; } charging;};ConfigurationOut configurationOut;//SPIFlash flash; // If you don't specify the library use standard SPI connectionSPIFlash flash;void setup() { Serial.begin(115200); while (!Serial) ; // Wait for Serial monitor to open delay(100); // flash.setClock(12000000); // uncomment here for Arduino SAMD boards flash.begin(); // If SPIMemory isn't recognized you can specify the size of memory// flash.eraseChip(); Serial.print(F("Flash size: ")); Serial.print((long)(flash.getCapacity()/1000)); Serial.println(F("Kb")); unsigned long strAddr = 0; Serial.println(); Serial.print(F("Start writing structure ")); if (flash.writeAnything(strAddr, configurationIn, true)){ Serial.println("OK"); }else{ Serial.println("KO"); } Serial.println(); if (flash.readAnything(strAddr, configurationOut)) { Serial.print(F("Read lux on configuration loaded from Flash: ")); Serial.println(configurationOut.lux); }else{ Serial.println(F("Read not work!")); } Serial.println(); while (!flash.eraseSector(strAddr));}void loop() {} |
這是串行結果(診斷處於活動狀態)。
1 2 3 4 5 6 7 8 9 | Chip Diagnostics initiated.No Chip size defined by user. Checking library support.Chip identified. This chip is fully supported by the library.Flash size: 8388KbStart writing structure OKRead lux on configuration loaded from Flash: 3.24 |
SPI Flash 上的 fat 檔案系統
也可以使用 Fat 檔案系統,但我不鼓勵這種方法,因為 Arduino UNO 和 Mega 的資源太低,無法使用這些資源,但如果您想嘗試,您可以閱讀有關 Arduino SAMD 或 esp8266 的 SPI Flash 的文章和esp32。